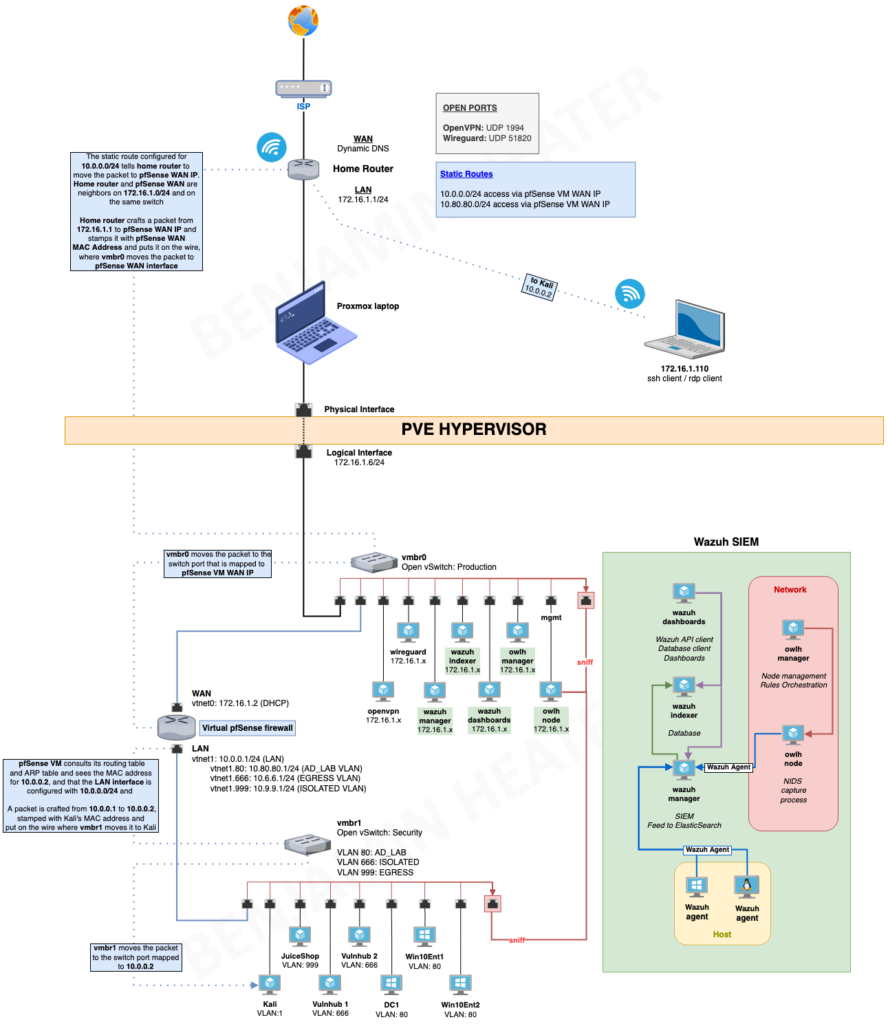
In this multi-module project, you’ll create a comprehensive cybersecurity home lab using Proxmox VE. By the end, you’ll have a secure environment for practicing penetration testing on various targets and enhancing your detection skills using a SIEM.
What We’ll Build
Prerequisites
Host
A host system to run Proxmox, such as an old laptop if you’re following this guide for that purpose, ideally with a capable processor and sufficient RAM. Alternatively, you could use a desktop computer or an old tower or rackmount server.
I run proxmox on an old Dell OptiPlex 5050 Micro Form Factor PC Computer, Intel Core i5-7600T, 64GB DDR4, 1TB SSD. Single Port NIC
Recommended Specifications
- A somewhat current i7 CPU
- The more cores the better
- 32 GB RAM
- 16 GB RAM will work for some steps of this pject
- Could easily run Kali and some Vulnhub VMs
- Won’t work with the SIEM or Active Directory lab
- Upgrade if you can
- 16 GB RAM will work for some steps of this pject
- 500 GB SSD storage
- More than one disk would be preferred
- A smaller disk for the Proxmox installation
- A larger disk to store the guest disks
- More than one disk would be preferred
- An Ethernet port for wired connectivity
- Could be an Ethernet jack built into the laptop
- Or a USB dongle
- Proxmox does not play well with wireless connections and you want your server to have a stable connection anyway
Installing Proxmox VE 8
A Note on Virtualization
Type 1 Hypervisors
Type 1 hypervisors, often referred to as “bare metal” hypervisors, run directly on the computer’s hardware without an underlying operating system.
• Installed directly on the disk
• Loaded immediately when the computer starts
• No other operating system runs alongside it
• Provides full access to the system’s hardware resources
Examples of Type 1 Hypervisors:
• VMware ESXi
• Proxmox
• XCP-NG
Type 2 Hypervisors
Type 2 hypervisors operate on top of an existing operating system, such as Windows, Linux, or macOS. Unlike Type 1, they don’t have direct access to hardware resources, as they share them with the host operating system.
• Installed within a primary operating system
• Loaded after the host OS starts
• Cannot utilize 100% of the hardware resources
• Easier to set up for desktop virtualization and testing
Examples of Type 2 Hypervisors:
• VirtualBox
• VMware Player
• VMware Fusion
Preparing the Laptop
Keep in mind that the steps I’m following here may differ from what you’ll need to do to set up your computer. This guide is intended to point you in the right direction and provide general guidance.
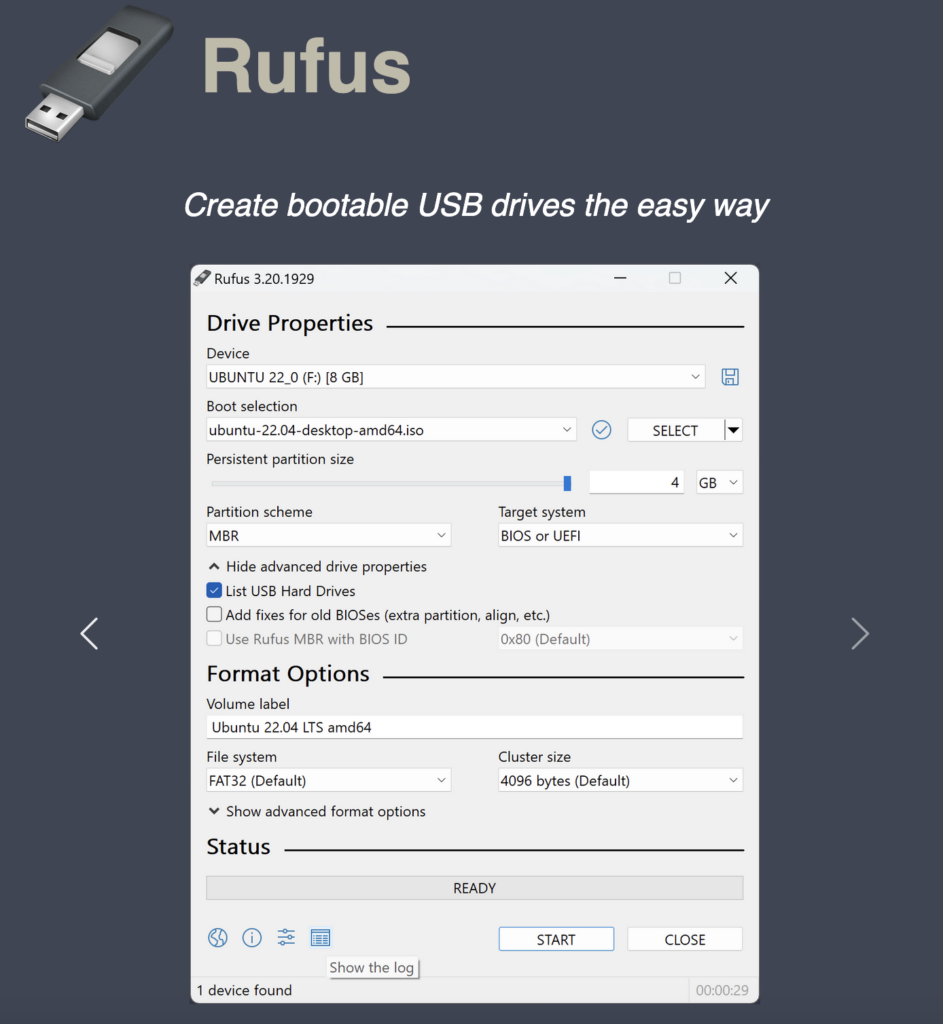
Creating a Bootable USB Drive
First, Download the proxmox VE ISO.

Then, use a USB drive to make a bootable image using the ISO file.
Ensure that virtualization is enabled in your bios.
Boot from Bios
Boot from the USB Drive
If you haven’t already, before you boot from the USB drive, please ensure that you’ve plugged in a wired Ethernet cable from your Proxmox host to your router or switch
Power off the laptop and insert the USB drive. Power on the laptop and press the ESC key until you reach the setup menu.
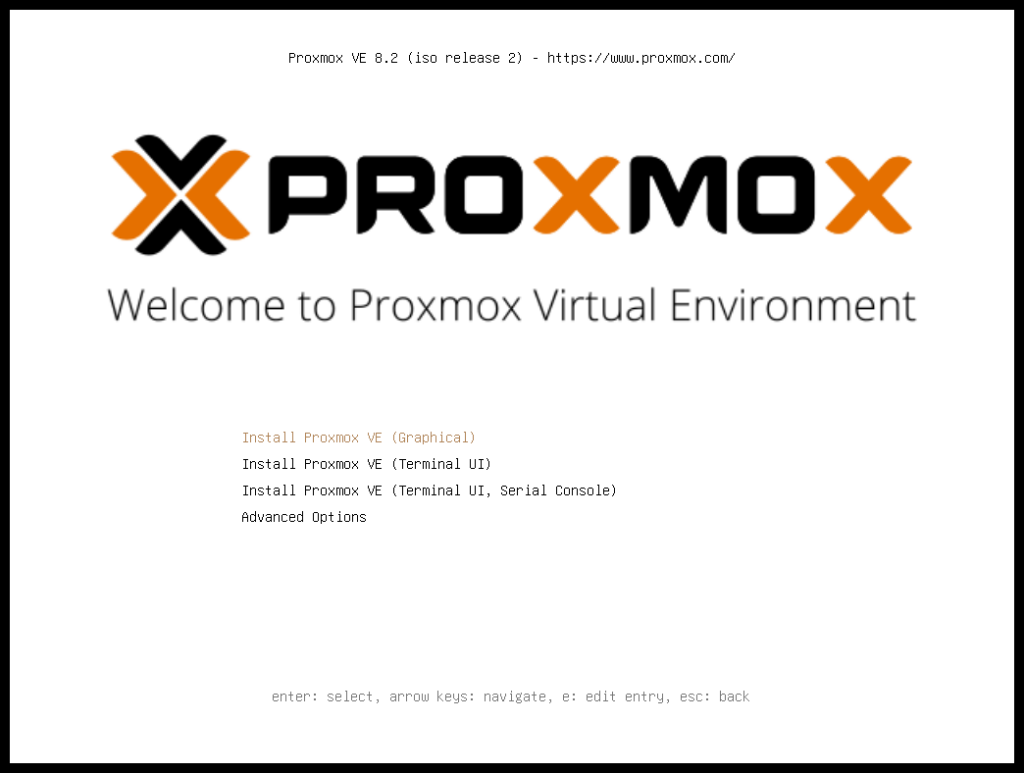
Proxmox Installation Steps
Choose Install Proxmox VE.
Select the install disk and click Options. I will not be partitioning my disk as I have just a single disk and will proceed with the installation leaving the default values as is.
Set Location and Time Zone
Set your preferred Location (Country), Time zone and Keyboard layout.
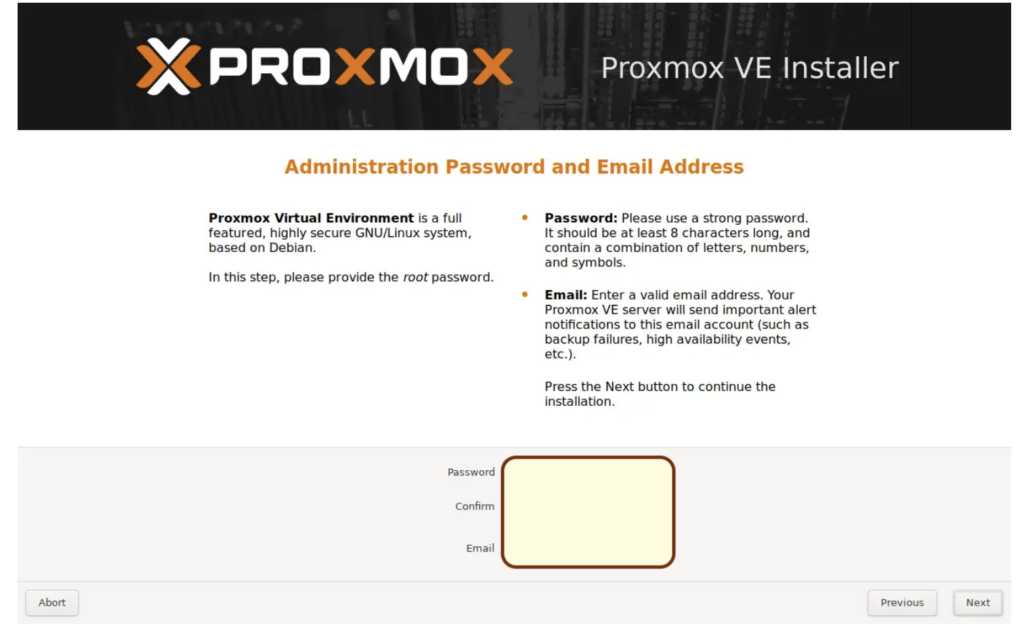
Create Admin Password and Email Address
Create a password for the Proxmox VE web interface. This password will be used to log in to the Proxmox VE web management console. Also specify the valid email address where all notification will be sent.
Network Configuration
Next, you’ll need to configure the network settings for Proxmox VE. Set FQDN, static IP address, subnet mask, gateway, and DNS server. Ensure that you specify the correct network configuration according to your environment.
Begin Proxmox VE Installation
Review your installation settings one last time.If everything looks correct, click on “Install“. The installation process will begin, and Proxmox VE will be installed on your bare metal server.
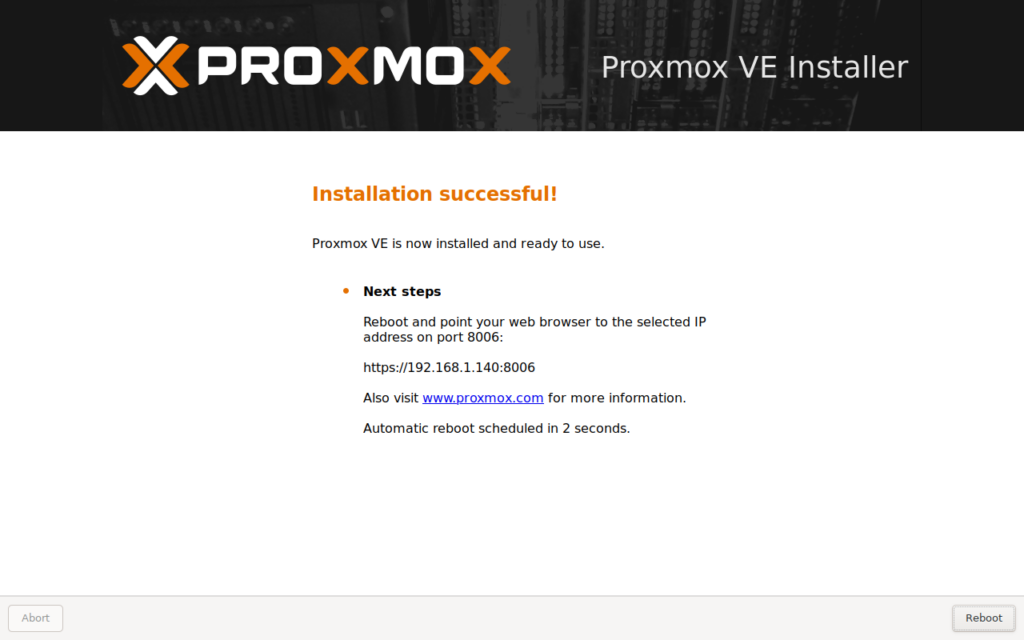
Access the Proxmox VE Web Interface
Open a web browser and navigate to the IP address you assigned in Step 7, followed by port 8006 (e.g., http://your_server_ip:8006).
While accessing the Web interface, we will get following screen, So Accept the Risk and Continue as we are using self-signed certificates for web interface.
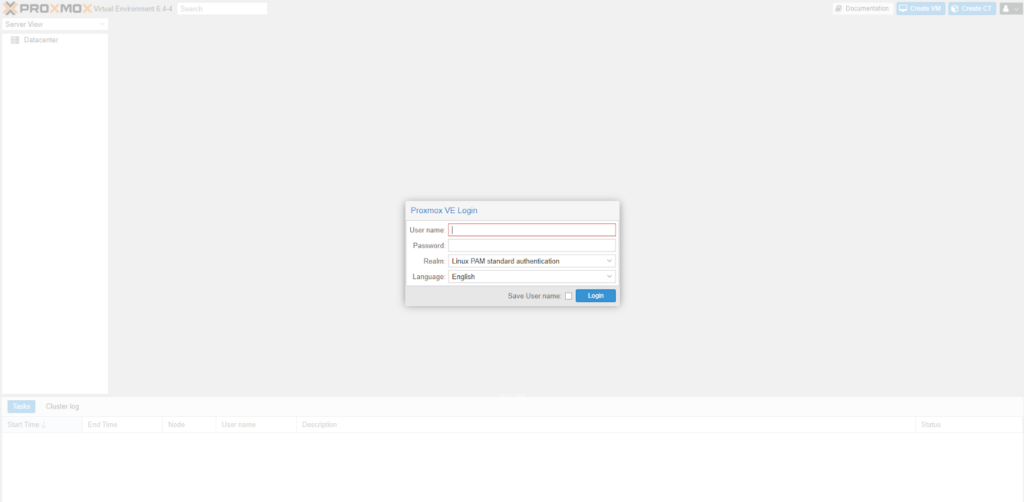
To log in, the username is root and the password is whatever you set it to during the installation steps.
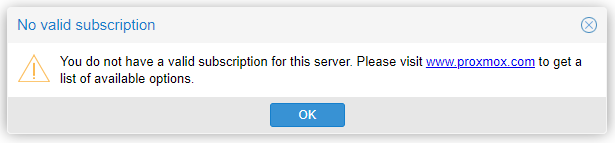
Upon logging in, you will be informed that you do not have an active support subscription. You can press OK and safely ignore this.
Finally, we will get the following Proxmox VE Web UI.
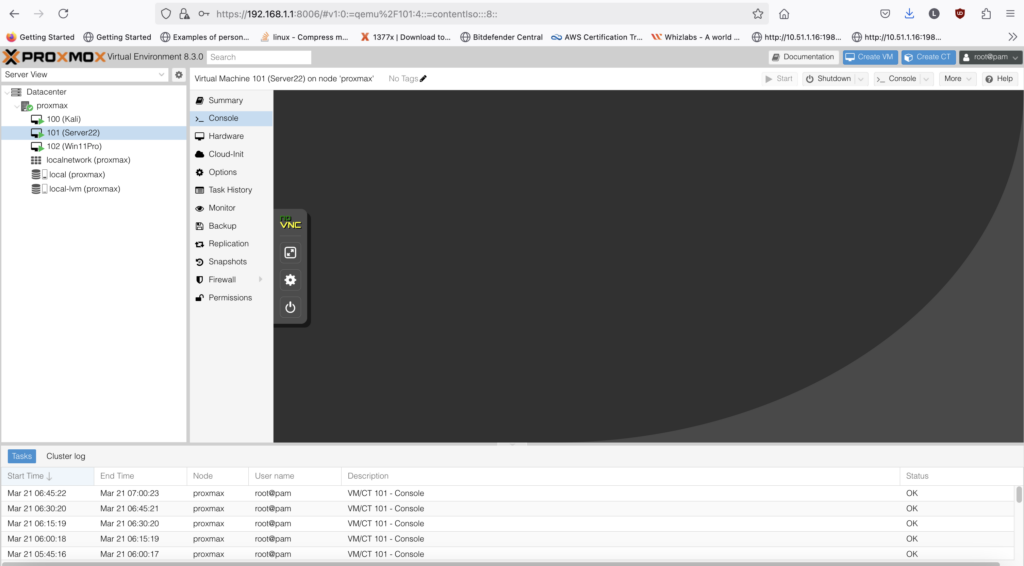
Great, this confirms that Proxmox VE has been installed successfully on your server.
No Responses